![]()
Flatbed Scanning
Photoshop Scanning Procedures Using Epson Flatbed Scanners
Acquire accurate and complete information from personal color and b/w
photographic prints using several types of flatbed scanners. Follow
these exact steps in order to alleviate any potential problems with color
casts, limited pixel information, and restricted tonal ranges.
Photographic Prints, Documents, Negatives and Slides:
1. Make
sure to switch the Epson flatbed scanner to ON before attempting
to launch the Adobe Photoshop program. The green light on the scanner
flashes when information is being transferred to the computer.
* It is best to wait
until the green light is solid before launching any computer programs
or making any changes.
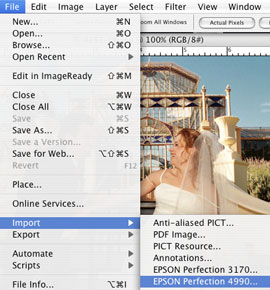
2. Place
negatives/slides emulsion side up, and prints image side down. Launch
Adobe Photoshop and go to File>Import>Epson
Perfection. This
will activate the Epson software from which you will scan your imagery.
* If there is no twain plug-in located in Photoshop, reload the scanner
software. Reloading the software will install a Twain plug-in to the Photoshop
Plug-ins folder.
3. The Epson Perfection software should now be displayed in front of the Photoshop program. First, set the proper Document Type for the job (ex. Positive Film). Next, click Preview. A Progress monitor window is displayed while the scanner acquires the preview information.
* Click on the arrows next to the Preview button to choose type of thumbnail display.
** Photoshop's tools
and options are not active while the Epson window is open.
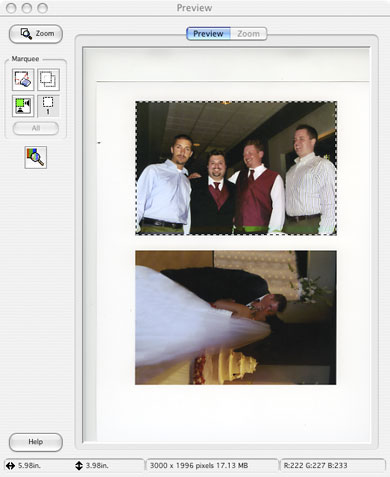
4. Draw a crop marquee around the image area using the mouse cursor. Dancing ants are displayed representing the edge of the crop. Each edge of the crop marquee is independently adjustable (only in a linear fashion, so try and place photos straight).
* At this time it is best to remove any white or black edges that are not part of the image area using the crop tool. Inaccurate scans can result from careless cropping.
5. Next, set Image Type to 48-bit color and the Resolution of the image to 300ppi. Adjust the values in the Target size to establish the enlargement dimensions (enlarge the maximum value to 17 inches to get near 11x17" images).
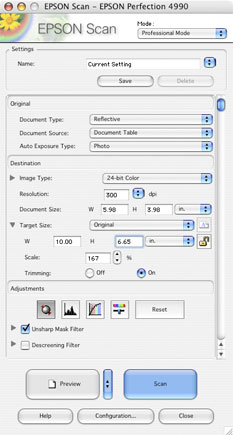
6. In the Adjustments area, click Histogram to adjust the density of the image. The Preview window should immediately display the effects of any changes. Adjustment may also include pulling up or down on Curves to improve the tonal range. Inaccurate color casts can also be alleviated by clicking one of the independent RGB channels below the composite channel. Press OK to accept all changes.

7. Lastly, press the Scan button to acquire the pixel information from the original. The Progress monitor is again displayed. Wait until this window disappears before performing another function. When the scan is complete, the final result will be automatically displayed in Adobe Photoshop. Consider experimenting with the scanner Descreening Filter, Color Restoration, and Dust Removal
* Be sure to save your original scans descriptively and store them in a safe place.
8. After work is complete, make sure to save
the file in a designated folder. Go to File>Save As and
name the file, select a location, and choose the proper Format (.psd
will save layer information and does not degrade the image file).
Note-
When making changes to an original scan file
in Photoshop, it is best to rename the file by selecting the Save
As function. This will ensure that the original scan information
stays intact without destructive changes.
For resolution basics:
http://www.magicpixel.com.au/magicpixel/html/scan1a.html
For scanning tips and tricks:
http://www.scantips.com/faq2.html#slides
For Epson scanner descriptions and comparisons:
http://www.epson.com
© 2007, Matthew Roderick